
Content
Getting Started: Preparation is Key
Before you begin, find a comfortable, quiet space where you won’t be interrupted. Sit comfortably in a chair, on the floor, or even lie down if you prefer. Dimming the lights or putting on some calming music can enhance the relaxing atmosphere, but it’s not essential. The main thing is that you feel at ease. Consider using a little massage oil or lotion. This helps your hands glide smoothly over the skin, preventing friction and making the strokes feel more luxurious. Choose a neutral oil like jojoba, almond, or even coconut oil, or a lotion you enjoy. Use just enough to allow glide, not so much that you feel greasy. Be mindful of slippery hands and surfaces afterwards! Take a few deep breaths before you start. Inhale slowly through your nose, feeling your belly expand, and exhale slowly through your mouth. This helps centre yourself and signals to your body that it’s time to relax.The Building Blocks: Basic Massage Strokes
Professional massage therapists use a wide vocabulary of strokes, but you only need a few basics to make a difference for yourself. Focus on mastering these foundational movements:Effleurage: The Gentle Glide
Effleurage involves long, flowing strokes using the entire palm of your hand, or sometimes just the fingertips. Think of it as gently spreading lotion or smoothing out fabric. The pressure can vary from very light, almost like a feather touch, to moderately firm. It’s typically used at the beginning and end of a massage session, and as a transition between other strokes. How to do it: Place your flat hand on the area you want to massage – your forearm, thigh, or the side of your neck. Glide your hand slowly and rhythmically along the length of the muscle. Always stroke towards the heart when working on limbs (e.g., from wrist to elbow, ankle to knee). This theoretically aids circulation, but mostly feels more natural. Use lighter pressure on the return stroke if you glide back. Repeat the movement several times, feeling the warmth generated under your hand.Petrissage: The Kneading Motion
Petrissage is the technique that most people associate with massage – the kneading, lifting, rolling, and squeezing of muscle tissue. It works deeper than effleurage, helping to release tension held within the muscle belly. It’s best suited for fleshier areas like your calves, thighs, upper arms, and shoulders. How to do it: Grasp the muscle tissue gently between your thumb and fingers, or between both hands. Lift the tissue slightly away from the bone, then squeeze and roll it rhythmically. Imagine kneading dough. Your movements should be slow and deliberate. Don’t pinch the skin; focus on manipulating the muscle underneath. Adjust your pressure based on how the muscle feels – it should feel like satisfying work, not painful pinching. Work methodically over the target area.Friction: Targeting Specific Spots
Friction uses smaller, more focused movements, often applied with the fingertips, thumbs, or the heel of the hand. These can be small circular motions or short back-and-forth strokes applied across the grain of the muscle fibres (cross-fibre friction). Friction generates heat and helps break down adhesions or target specific tight spots, often found around joints or in dense muscle tissue like the upper back. How to do it: Using your fingertips or thumb pads, apply direct pressure to a specific point of tension. Make small, deep circles without gliding over the skin much – the skin should move with your fingers over the underlying tissue. Or, move your fingertips back and forth across the muscle fibres. Keep the pressure firm but comfortable. This stroke is powerful, so use it judiciously and listen carefully to your body’s feedback. Avoid applying deep friction directly over bones or inflamed areas.Tapotement: Rhythmic Tapping
Tapotement includes a variety of light, springy, rhythmic percussion movements. These can involve tapping with the fingertips, ‘cupping’ the hands (forming a hollow cup and tapping), or light ‘hacking’ with the sides of the hands (like gentle karate chops with loose wrists). Tapotement is generally stimulating and invigorating rather than deeply relaxing. How to do it: Keep your wrists loose and relaxed. For tapping, use your fingertips in a light, alternating pattern. For cupping, create an air pocket with your slightly curved hand and tap the muscle – it should make a hollow sound. For hacking, use the side of your hand opposite the thumb, bouncing lightly and rapidly. Apply tapotement briefly over larger muscle groups like thighs or shoulders. Keep it light and brisk. Avoid tapping over bony areas, the kidneys (lower back), or the neck.Putting it into Practice: Easy Self-Massage Areas
Now, let’s apply these strokes to some easily accessible parts of your body:Hands and Forearms
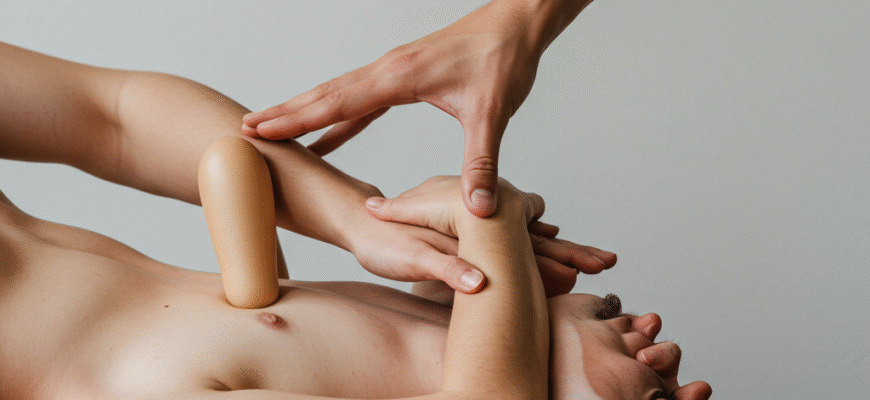
Our hands and forearms work hard! Start with effleurage strokes from your wrist up towards your elbow on both the top and bottom of your forearm. Use petrissage (kneading) on the fleshier parts of your forearm. For your hands, use your opposite thumb to apply circular friction throughout the palm, especially the fleshy area at the base of your thumb. Gently knead and glide along each finger from base to tip. Finish with long, soothing effleurage strokes over the whole hand and forearm.Neck and Shoulders
This is a common area for tension. Sit comfortably and let your shoulders drop. Use gentle effleurage strokes with your fingertips, starting from the base of your skull and gliding down the sides and back of your neck towards your shoulders. Repeat several times. Then, use petrissage on the trapezius muscle (the fleshy muscle running along the top of your shoulder). Grasp the muscle gently between your thumb and fingers and knead along its length, from the neck outwards. Be gentle here. You can also use your fingertips to apply small, circular friction at the base of the skull where the neck muscles attach. Tilt your head slightly to one side to access the opposite side more easily.Important Note on Neck Massage: The neck is a sensitive area containing important structures. Always use gentle to moderate pressure. Avoid strong pressure on the front or sides of the neck. If you feel any sharp pain, numbness, or dizziness, stop immediately.
Legs and Feet
Your legs carry you all day. Sit where you can comfortably reach your lower legs. Apply effleurage strokes from your ankle up towards your knee on your calf muscle. Follow with petrissage, kneading the calf muscle thoroughly. Use your thumbs to apply deeper pressure if needed, working into any tight spots. For your feet (if accessible), support one foot on the opposite knee. Use your thumbs to apply firm circular friction all over the sole. Pay attention to the arch and the ball of the foot. Gently glide and knead along the top of the foot. Finish by massaging each toe individually.Listening to Your Body & Aftercare
The most crucial aspect of self-massage is paying attention to your body’s signals. Massage should feel good, or at least like a ‘good hurt’ – a satisfying release of tension. If anything causes sharp pain, stop immediately. Avoid massaging over:- Recent injuries (sprains, strains, fractures)
- Inflamed or infected skin (rashes, cuts, bruises)
- Varicose veins (use only very light effleurage around them, not directly on them)
- Areas of unexplained pain or lumps
- Directly over joints if painful


