The Importance of Patch Testing DIY Ingredients

The Importance of Patch Testing DIY Ingredients Beauty Tips
Diving into the world of do-it-yourself beauty treatments can be incredibly rewarding. Whipping up your own face masks, scrubs, or lotions using ingredients often found right in your kitchen feels empowering and natural. There’s a certain charm to knowing exactly what you’re putting on your skin, avoiding long lists of synthetic chemicals found in many commercial products. However, this enthusiasm sometimes overshadows a crucial step: patch testing. Just because an ingredient is natural, organic, or even edible doesn’t automatically mean it’s safe or suitable for direct application to your skin. Our skin is a complex organ, our body’s first line of defense. It’s unique to each of us, with varying levels of sensitivity, different microbiomes, and predispositions to certain reactions. An ingredient that one person tolerates perfectly might cause irritation, redness, or even a full-blown allergic reaction in another. This is where the simple, yet vital, practice of patch testing comes in. It’s your personal safety check before committing your face or body to a new homemade concoction.

Why Bother Patch Testing Natural Ingredients?

It’s a common misconception: “If I can eat it, surely I can put it on my skin?” Unfortunately, skin reactivity doesn’t work that way. Your digestive system has mechanisms to break down substances that your skin barrier doesn’t. Think about lemons – great in water or on food, but applying pure lemon juice to your skin can lead to photosensitivity (making you much more prone to sunburn) and irritation due to its high acidity. Similarly, many popular DIY staples can be problematic:
  • Essential Oils: While fragrant and possessing certain beneficial properties, they are highly concentrated plant extracts. Used undiluted or in high concentrations, they can cause significant irritation, sensitization (leading to future allergies), and burns.
  • Baking Soda: Often touted as a natural exfoliant or cleanser, baking soda has a very alkaline pH. Your skin’s natural state is slightly acidic (the acid mantle), which protects it. Disrupting this pH balance with alkaline substances can damage the skin barrier, leading to dryness, irritation, and increased susceptibility to infection.
  • Raw Apple Cider Vinegar: Like lemon juice, its acidity can be too harsh for direct skin application, potentially causing burns or irritation, especially if not heavily diluted.
  • Certain Spices: Ingredients like cinnamon or cloves can be potent irritants when applied topically, causing redness and a burning sensation.
  • Plant Extracts/Juices: Even seemingly innocuous things like strawberry juice or celery juice can cause allergic reactions or phytophotodermatitis (a reaction triggered by sunlight after contact with certain plant chemicals) in susceptible individuals.
Might be interesting:  DIY Bath Smoothies: Blending Skin Loving Food
Patch testing helps you identify potential adverse reactions before you apply an ingredient or mixture all over a large area. It allows you to pinpoint which specific component might be causing trouble if you’re testing a finished product.

Understanding Potential Reactions

When you patch test, you’re primarily looking for two types of adverse reactions:
  1. Irritant Contact Dermatitis: This is the more common type of reaction. It occurs when a substance directly damages the skin’s outer layer faster than it can repair itself. It usually appears as redness, dryness, itching, or a mild burning sensation localized to the area of contact. It’s often dose-dependent – a higher concentration or longer exposure increases the likelihood and severity of the reaction. Baking soda or undiluted essential oils often cause this type of irritation.
  2. Allergic Contact Dermatitis: This is a true immune system response. It happens after your skin becomes sensitized to a specific ingredient (the allergen). Upon subsequent exposure, even to tiny amounts, your immune system triggers an inflammatory reaction. This can manifest as intense itching, redness, swelling, bumps, or even blisters, and it might spread slightly beyond the initial contact area. Unlike irritation, this reaction isn’t immediate; it typically takes 12-72 hours (or sometimes longer) to develop after exposure. Essential oils, fragrances (even natural ones), and certain plant compounds are common culprits. Once you develop an allergy, you usually have it for life.
Patch testing is your best defense against triggering either of these unpleasant responses across a larger area of your skin.

The Correct Way to Patch Test

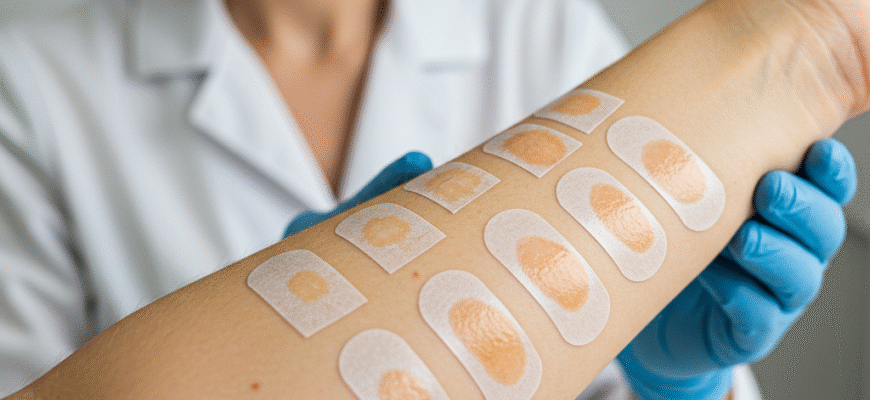
Performing a patch test is straightforward, requiring only a little patience. Follow these steps for reliable results: 1. Choose Your Ingredient/Product: Decide what you want to test. If it’s a single raw ingredient (like an oil or juice), prepare it as you intend to use it in your final recipe. This might mean diluting an essential oil in a carrier oil (like jojoba or sweet almond oil) according to safe usage rates, or mixing a powdered clay with water. If you’re testing a finished DIY product (like a mask or lotion you’ve already mixed), use the final product itself.
Might be interesting:  How to Choose Between a Robe and Lounge Set Wear?
2. Select a Test Site: Choose a discreet, inconspicuous area of skin that’s similar in sensitivity to where you plan to use the product, but where a potential reaction won’t be overly bothersome or visible. Good locations include:
  • The inner elbow
  • The underside of your wrist
  • Behind the ear (especially good for facial products)
Ensure the chosen area is clean and dry before application. Avoid areas with broken skin, existing irritation, or rashes. 3. Apply a Small Amount: Dab a small quantity (about the size of a dime or smaller) of the prepared ingredient or product onto your chosen test spot. Don’t rub it in aggressively; just apply it gently. 4. Cover (Optional) and Wait: You can cover the spot loosely with a bandage, especially if it’s a product that might rub off easily. This isn’t always necessary, particularly for oils that absorb quickly. The crucial part is the waiting period. Ideally, leave the substance on the skin (or reapply if necessary, mimicking usage) and monitor the area for at least 24 to 48 hours. Some allergic reactions can be delayed, so patience is key. Try to keep the area dry during this time. 5. Observe Carefully: Check the test spot periodically throughout the waiting period and especially at the 24-hour and 48-hour marks. Look for any signs of redness, itching, swelling, bumps, blisters, burning, or any other form of irritation. Note that mild, temporary redness upon initial application might sometimes occur with active ingredients, but persistent, uncomfortable, or worsening reactions are red flags. 6. Interpret the Results:
  • No Reaction: If the skin appears completely normal after 48 hours (or even up to 72 hours for extra caution), the ingredient or product is likely safe for you to use on a larger scale.
  • Reaction Occurs: If you experience any signs of irritation or allergy, wash the area immediately and thoroughly with mild soap and water. Do not use the ingredient or product. Note which substance caused the reaction so you can avoid it in the future. If the reaction is severe or persistent, consult a healthcare professional.
Important Safety Note: Skipping a patch test might seem like saving time, but it significantly risks skin irritation or triggering allergic reactions. Remember that even ingredients commonly consumed safely can cause problems when applied topically to your unique skin. Always prioritize this simple safety check before applying any new DIY ingredient or mixture generously, especially on sensitive areas like the face.

Test Ingredients AND Final Mixtures

It’s wise to patch test not only individual raw ingredients when you first acquire them but also your final DIY creations. Why? Because ingredients can interact with each other in unexpected ways. An ingredient that seems fine on its own might become irritating when combined with something else, perhaps due to changes in pH or concentration. Testing the final mask, serum, or cream gives you the most accurate picture of how your skin will tolerate the complete formulation.
Might be interesting:  Monogrammed Towels: Adding a Personal Touch Class
Think of it like baking: you know flour is fine, sugar is fine, and eggs are fine. But you still want to taste the final cake batter (or maybe just the baked cake!) to ensure the combination works and tastes good. Similarly, testing the final DIY product ensures the combined elements are agreeable to your skin.

Consistency is Your Skin’s Best Friend

Make patch testing a non-negotiable habit in your DIY beauty routine. Every single time you introduce a new ingredient – whether it’s a new brand of carrier oil, a different essential oil, a fresh batch of herbs, or a novel food item you read about online – perform a patch test. Do the same for every new recipe you try, even if it uses ingredients you’ve tolerated individually before. This diligence might seem tedious initially, but it’s a small investment of time that can save you considerable discomfort and potential skin damage down the line. It empowers you to experiment safely and confidently, truly reaping the benefits of personalized, homemade skincare without the nasty surprises. Embracing patch testing is embracing responsible and skin-loving DIY. Ultimately, the allure of DIY beauty lies in its potential for customization and natural goodness. By incorporating patch testing as a standard procedure, you ensure that your journey into homemade cosmetics is not only creative and fun but also, most importantly, safe for your unique skin. Don’t let impatience compromise your skin’s health; test first, then enjoy your bespoke creations!
Sophia Ainsworth

Sophia Ainsworth is a Wellness Advocate with over 8 years of experience specializing in gentle skincare rituals, aromatherapy, and mindful practices for daily calm. Certified in Aromatherapy and Mindful Practice Facilitation, she is passionate about making self-care accessible and joyful through practical guides and workshops. Sophia shares her insights and resources for tranquil living here on Hush Skin & Body.

Rate author
Hush Skin and Body
Add a comment